Monday, December 3, 2012

Welcome baby boy...

Recently, I visited a dear friend that just had an adorable little boy. Here is the card I made for her.


Materials Used:
+ Kraft Paper
+ Card Stock
+ Stamped Greeting (The cover of the card was a one-word greeting stamp, the inner card was written using 2 different fonts of alphabet stamps...they are best way to stamp a saying when you can't find that perfect stamp!)
+ Glitter gel
+ Decorative Masking Tape (a.k.a. Washi Tape)
+ Inside of the card is lined with linen-texture paper.

Saturday, December 1, 2012

Holiday Market...

 I wanted to thank the employees of the Writer's Guild for letting me take part in their annual Holiday Market yesterday. It was a lot of fun and I met so many great people. I hope I can be involved again next year. :) I truly enjoyed creating the cards and other paper-goods for the event. Here are some pics of my table...


Some of the items for sale were the following: table place cards, variety of gift tag sets and holiday cards. They will be available in my Etsy shop if they aren't already by the time you read this. This was not a huge event since it was for the office employees rather than the public so the inventory amount was just right for the occasion. I hope to be able to attend more craft shows in the future. When I do, I will let you know here so you can come say hi! :)

Wednesday, November 21, 2012

Thanksgiving Favors/Place Cards...

Happy Thanksgiving!!!

I hope you're all having fun as you spend time with your family & friends during the holiday!

If you are looking for some decorating ideas, I wanted to share my take on place cards for the table this year, something extra special. It's a very simple, yet elegant design. Not only will the cards have the guest's name, the added bonus is the treat attached to it! The bags are filled with a vanilla sandwich cookie that has the most amazing dulce de leche filling. I got the cookies from a local bakery. If you are re-creating this, you can choose your favorite treat, Oreo's or Hershey Kisses can work equally well.


These lovely packages will rest on each plate, adding a festive touch to the table!

Materials Used:
* Small Cellophane Bag (food-safe quality)
* Premium colored card-stock - in Thanksgiving colors
* Matching polka-dot ribbons (to hide the staples)
* Printed and die-cut kraft paper for the names
* Lovely treat for the filling.


Here is a photograph of the finished product. As you can see there are many variations. Have fun with it. You can keep it simple or you can do any number of decorative embellishments such as the rounded corners and added label as shown above.

Enjoy!

Monday, November 19, 2012

Free Printable ~ Thanksgiving Prep!

Happy Monday!! 
Welcome to Thanksgiving Week! 

I am very thankful that you visited my blog! As a treat, I wanted to provide you with a freebie!
Since this is a stressful time for many who may be hosting the annual feast, it's not that uncommon for some key items to be overlooked. I thought it would be helpful to create a handy list of many of the common Thanksgiving staples to help you stay on track as you prepare for your week. 


I hope this helps at least a little bit!

Enjoy and don't forget to wear your stretchy pants on Thursday! :-)

Sunday, November 18, 2012

Nostalgic Gamer Birthday Card...

This is a card that I created for my husband to give to his boss for his birthday. I heard he's' a gamer. Channeling the ever-so-nostalgic Nintendo's Super Mario Brothers, I came up with this pixelated mushroom image for his card. It's based on the Super Mario Brothers 3 power-up mushroom. Instead of going with typical "square" pixels, I thought it would be interesting if dots were used instead. It was a fun experiment since I have never attempted a card like this before. I had to work with a grid as well as punch out the appropriate colors out of cardstock. It took a few days (mostly due to the punching and assembling) and this lovely mosaic of pixels was done. I stamped a birthday greeting and left the back of the card blank for my husband to put his message. The card is a non-traditional postcard style which was mostly due to the size of the pixel mosaic, a folded card just would not do. What do you think?


As an added treat, a dozen mini specialty cupcakes completed the gift!
This box was one of 2 dozen, 1 for the boss, the other for the office! :)

Friday, November 16, 2012

Primary Birthday...

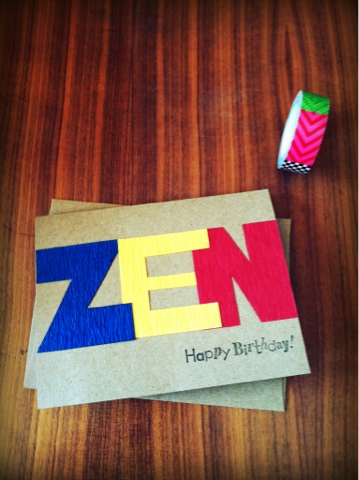
Recently, I had the pleasure of attending a party celebrating the first birthday of a close friend's son.  The birthday-boy's name is Zen. I thought it would be playful to make a card with his name on it. Primary colors are always fun, especially since my gift to him was a colorful large-scale building block set! I added a stamped birthday greeting and sealed the envelope with patterned washi tape. I also stamped his name to a die cut circle and affixed it to the front of the envelope. Since it was his first birthday, primary colors were the way to go! The kraft paper grounds the boldness of the colors to a more juvenile style. Check out the final outcome...


Wednesday, October 10, 2012

Birthday Cards...

This past weekend was my mom and brother's birthdays. My brother on the 5th of October, and my mom on the 6th. We spent time celebrating and I made cards for them of course!! Check them out...

This is the card I made for my Mom:


This is the card I created for my brother:


They were fun to make!


Materials Used (all archival quality):
- Premium colored card stock
- Premium patterened card stock "lime twist" by My Mind's Eye
- Decorative washi tape
- Hand-stamped greeting w/archival ink
- Dimensional stickers "gift shape" by Punch Studio, Culver City
*as always, cards are accompanied with coordinating handmade sticker seals created by me!